The F3 Reformer was developed to bring the benefits of a Pilates Reformer workout into your home, without the need to have a space dedicated to your Pilates workout. Taking the best from its predecessor the F3, the F3 now features lighter weight aluminium runners and an innovative new carriage design that means the wheels never cross the join, so you cannot tell that this machine is a folding Reformer in use! Featuring the same springs as our professional Reformers, the F3 offers smooth progressive resistance and a range of adjustments to fine tune the machine for your workout. The F3 folds up in a matter of minutes into a compact and self-contained machine that can be easily wheeled around and stored safely out of the way.
Specification & Adjustablity
Travel: 97cm
Resistance: 4 Nickel plated music wire springs (1 Medium, 2 Strong and 1 Light)
x4 Foot Bar positions: 3 plus down & storage position
New Align-Pilates double loop handles with “silent” metal free connectors for a quieter workout
3 position head rest & fixed shoulder rests with choice of 2 widths
Aluminium runners with 8 wheel design. Locking bolts to lock Reformer both open and closed. 4 wheels to enable movement of the Reformer when open or closed. 6 adjustable feet to ensure your Reformer sits flat and can run smoothly
ISO20957-1 Class S Item. Max User Weight: 120Kg. Suitable for users: 145cm – 193cm (4’10 – 6’4”)
Fixed shoulder rests with choice of 2 widths
Dimensions
Open size (maximums): 247cm x 70cm x 47cm
Carriage size: 89cm (L) x 58cm (W)
Folded size (maximums) 143.5cm x 70cm x 34.5cm
Weight: 58Kg
Packaging & Delivery
Delivered in 1 box: 133.5 x 69.5 x 32.5cm, Gross Weight 63.85kg
Intended Use
This equipment is intended for indoor use only.
Usage class: S – Studio
F3 Reformer Clear Space
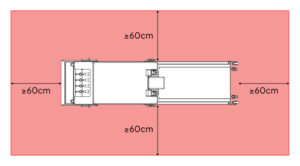
Free Area: A free area of at least 0.6m must be maintained around all sides from which the user can access the Reformer. The free area must also allow for emergency dismount. When equipment is positioned adjacent to other units, the free area may be shared.
Child Safety
Keep unsupervised children away from the equipment at all times. Failure to follow this instruction may result in injury.
Correct Use
Use the Reformer only as instructed and maintain controlled movement throughout every exercise. Do not use the equipment for exercises outside the scope of normal Reformer Pilates practice.
Reformer Map
F3 Reformer Map
Footbar
Carriage Bed
Removable Shoulder Rests
Rope Holder
Silent Straps & Ropes
Rope Pulley
Rope Risers
Rope Riser Adjustment Knob
Standing Wheels
Locking Knob
Adjustable Feet
Footbar Selector
Jump Board Fastener
Standing Platform
Assembly
Unpacking the F3 Reformer
Allowing for space to assemble the Reformer, carefully open the box and remove the polystyrene blocks and other packaging material. The box contains the frame and carriage with two boxes inside containing smaller parts. Open and lay out the parts. The two locking knobs should already be inserted in the frame of the F3 Reformer, see Fig.1. Please note: the rope risers with pulleys are already clipped to the rope riser holders on the frame.
Assembly Safety
Use caution when lifting or handling heavy components. Assemble the equipment on a flat, stable, horizontal surface.
Figure 1
Unfolding your F3 Reformer & Adjusting the Footbar
Warning: We recommend the F3 Reformer is opened and closed by two people to minimise the chance of injury. However the F3 can be opened and closed by a single person with relative ease, as the lifting weight is similar to lifting a heavy suitcase. If planning to open and close the F3 on your own we suggest familiarising yourself with the process using 2 people first and always be sure to use correct lifting technique. If you have back or similar issues you should avoid opening the F3 alone.
With assistance, lift the F3 out of the box and stand it on its feet. Remove the cardboard blocks that are positioned between the carriage and the runners. Cut the cable ties connecting the carriage to the frame. DO NOT CUT THE CABLE TIE THAT CONNECTS THE FOOT BAR. Next undo the two locking knobs, unfold the reformer and then reinsert the locking knobs.
Figure 4Figure 3
Note: upon opening the F3, the standing platform will remain approximately where it is whilst the wheels move away. First ensure there is space for the Reformer to open in this manner. Carefully unscrew the two locking knobs, whilst using your foot to prevent the Reformer opening. Then with your hands towards the centre of the lowering/lifting handle and your palm facing towards where the carriage will be placed (to avoid wrist injury) slowly lower the frame to the floor. Be sure to keep your hands and clothing clear of the hinge points and be careful not to lower the centre leg on to your foot. Once flat on the floor replace the locking knobs. The Reformer must always be locked open before use.
Detach all springs from the hooks and roll the carriage to the opposite end of the runners. This will give you access to the footbar and selector rod. Cut the cable ties that attach these to the frame. With assistance lift the standing platform end of the reformer to waist height and then swing the foot bar around so that its on top of the runners.
To attach the footbar selector bar to the footbar adjustment arm, insert the bar through the Reformer resting on the selector gear teeth. Then, using the two bolts with washers and allen key provided, screw these into the bar on either side through the hole in the footbar adjustment arm and then fully tighten the bolts see Figure 5. When complete roll the carriage back to the hooks and attach.
Figure 5
Levelling the Frame
The F3 has 6 adjustable feet to ensure the Reformer is level. If not level the F3 will not run smoothly. The feet are adjusted by screwing them in or out to adjust the height. Using a spirit level, adjust the feet to level the frame, ensuring that each foot is firmly in contact with the floor. Tip: Always lower a high foot before raising a low foot.
Installing & Locking the Shoulder Rests
Attach the shoulder rests to the carriage by using 4 Allen headed bolts. Please ensure these bolts are fully tightened. We recommend going round and tightening each bolt in turn, repeating several times – Figure 10. Note that each shoulder rest is off centred to its bracket, which allows you to have either a wide or narrow setting. Check which set up you prefer before attaching to the carriage.
Figure 10
Attaching the Rope Risers
Screw in the Rope Riser Adjustment Knobs (Figure 11), then pull out the adjustment knob to allow you to insert the Rope Risers themselves (Figure 12). Set the Rope Risers to the desired height by raising or lowering them to the height of a given hole, and then release the Adjustment Knob, ensuring the Rope Risers click into place and do not move up or down (Figure 13). Note: Figures 11-13 show the R8-Pro Reformer, however the assembly method is the same.
Figure 11Figure 12Figure 13
Attaching the Silent Ropes
Attach the Silent Handles of the ropes to the ropes themselves by threading the nylon loop of the handle through the rope eyelet, as shown in Figures 14, 15, and 16.
For each Silent Rope, loop the handle over the Shoulder Rest to hold it in place (Figure 17), then feed the end of the rope through the Pulley at the top of the Rope Riser (Figure 18). Then end of the rope should then be fed through the outer eyelets at the end of the carriage (Figure 19), then through the eyelet straight ahead underneath the carriage, before finally returning up through the hole in the carriage visible in Figure 20. Pull the rope up through the Pro Rope Adjuster by the Shoulder Rest until the rope is the appropriate length (Figure 21), and then press the lever of the Pro Rope Adjuster to lock the rope in place (Figure 22). The loose end of the rope can then be tucked out of the way through the other, unused eyelet at the end of the carriage. Note: Figures 14-22 show the R8-Pro Reformer, however the assembly method is the same.
The F3 is fitted with 4 springs, in 3 strengths to offer a wide range of possible resistances. Green = Strong x 2, Red = Medium x 1, Blue = Light x 1, see Figure 23. The springs can be used in any combination, although when using the Reformer for asymmetric exercises, please ensure the springs selected are on the same side that you are working on, or set equally in the middle, to ensure the carriage runs true. E.g. when doing a hip flexor stretch with one foot on the floor and the other on the shoulder rest.
Warning: After unfolding your Reformer and before use always check that the springs are properly attached to the underside of the carriage by pulling them firmly – the spring should stretch but not move or the spring may have become unhooked.
Figure 23
Folding the F3 Reformer
Watch the assembly video before doing for the first time. Attach at least one spring to the carriage. Remove the rope risers and attach them into the clips on the underside of the frame and lay the ropes on the floor in the centre of the frame, see Figure 24. Remove the locking knobs and with assistance, with one person on either side of the Reformer, place hands in the indicated position on the lowering/lifting handle as per Figure 25. Carefully lift the Reformer until it is fully upright, ensure the footbar adjuster arm bar sits in the second from the bottom footbar position so the footbar helps to stabilise the F3 then, whilst preventing the Reformer from reopening with your foot, replace the locking knobs. Note: the F3 must always be locked when in the closed position to prevent accidental opening. The straps can now be hung from the shoulder rests. It is now safe to wheel the Reformer away for storage – simply tip on to the wheels and move like a wheel barrow.
Figure 24Figure 25
Periodic Maintenance
Please check the apparatus before first use and after each of the first few uses to check that all the fittings are securely fastened. Thereafter, it is important to make regular maintenance checks. Equally inspection should be made immediately if any part appears not be operating correctly or something appears to be loose. Below follows a basic maintenance guide though our detailed maintenance guide and a sample maintenance log can be downloaded from our resources page.
Springs – inspect all springs for signs of wear, look for deformation, kinks, gaps and corrosion. Springs showing signs of damage must not be used and must be replaced immediately. Springs must be replaced every 2 years or after 3,000 hours, whichever is first.
Foot Bar – check that all allen bolts securing the bar to the aluminium arms and to the steel engagement bar and through the frame are tight.
Runners – ensure the runners are clean and free from grit to enable the smooth running of the Reformer. If excess dirt is spotted on the runners then the wheels may also need cleaning. We recommend cleaning the runners with a window cleaner eg. Windowlene.
Ropes and Handles – check ropes for signs of wear, fraying or nicks and replace if damaged. Check stitching on handles is intact and handles are not overly worn. Check the handle clips are working.
PVC Upholstery – regularly clean all upholstery on your equipment, we recommend using Gym Wipes from Vital Clean as these will not damage your upholstery. Beware that some bactericides and strong or abrasive cleaning products will dry out the vinyl and reduce its life. Vinyl is non-absorbent, so will not absorb dirt so surface wiping is only required.
Wheels – Remove the carriage and check for smooth rotation and signs of damage. If the wheels are not turning smoothly or the wheels are damaged this will impede smooth running and the wheels need to be replaced.
Shoulder Rests – check the pads are securely bolted on to the metal frame – if loose retighten.
Spring hooks – hand check that all eye hooks will not move. If loose remove, apply loctite and retighten.
Nuts & Allen Bolts – check all nuts and bolts are tight, including those on the rope pulley wheels and those securing the head rest.
The Main Hinge & Lifting Bar – check that hinge bolts are tight, but avoid overtightening the Allen bolt in the cross support or the hinge will become stiff.
Congratulations! You are now ready to use your F3 Reformer. Now would be a good time to make a note to replace your springs in 2 years or, within 3,000 hours of use, whichever is sooner. We hope that you enjoy using your new F3 Reformer!
Troubleshooting Smooth Running of your F3 Reformer
If your Reformer is not running smoothly please follow these step in order to get it back up and running smoothly:
Check the Reformer is level using a spirit level and adjust the feet as described
Check the runners and wheels are clean and free from dirt and grit
Check the wheel alignment of the side wheels
a) Occasionally the side wheels on your Reformer may be knocked out of alignment. You will know this if you hear squeaking where the side of one of the horizontal wheels hits the side of the runner. If this is the case adjustment is easy by following these simple steps
b) Identify which side of the carriage the fixed wheels are on (this should be the right hand side if looking from the spring bar end towards the head rest).
c) Disconnect all springs and roll the carriage to the riser end of the Reformer. Now push the carriage from the side ensuring both the fixed side wheels are touching the side wall of the runner.
d) Now tilt the Reformer on its right hand side and using an 8mm spanner slacken the pair of locking bolts (Figure 21) on each of the adjustable side wheels, then screw in or out the side Allen Bolt (Figure 26) so the adjustable side wheel stops approximately 2mm from the edge of the runner. Then tighten the pair of Allen bolts before tightening the side Allen bolt. Repeat the process for the other side wheel.
e) Lower the Reformer, ensuring it is level and then with NO springs attached gently move the carriage for the full length of the frame and back, ensuring you push it from a central position so as to keep it in line, now attach a pair of springs and check the bed is running smoothly with no squeaking, additional fine tuning may be necessary to achieve optimal performance.
Check the wheels and bearings are not damaged. If damaged replace.
Figure 26
Basic Reformer & Exercise Safety
If you are not familiar with using a Pilates Reformer we suggest you seek advice from a qualified Pilates professional in order to learn how to get the most out of your Reformer and to cover the basic safety aspects of using this type of equipment. A number of companies also offer short safety induction courses.
Pilates is about smooth and controlled movement, when performing exercises try to prevent the carriage from slamming into the carriage stops and the springs from recoiling in an uncontrolled manner as this can damage the spring and shorten its life.
Secure the carriage with at least one spring when your Reformer is not in use. Do not get on the carriage when there are no springs attached unless you deliberately want to do this.
When standing on the Reformer always put your first foot on the standing platform and then the other on the carriage. When standing on the carriage ensure that your foot is not standing on the head rest. When getting off the Reformer from standing take your foot off the carriage first and then step down off the standing platform.
Use your Reformer in a clear space with at least 1m of space all around the machine. This equipment is for indoor use only on a firm and flat surface.
When using a Reformer less is often more, remember, when performing certain exercises less spring resistance makes the exercise more challenging.
Before starting any exercise program, consult a physician.
Before using the equipment, read and follow instructions in the safety manual and obtain thorough instruction from a Qualified Trainer.
Use equipment only for recognised Pilates repertoire.
Stop exercising if you experience chest pain, feel faint, have difficulty breathing or experience musculoskeletal discomfort.
Keep clothing, body and hair free from all moving parts.
Do not use if equipment appears worn, broken or damaged. Do not attempt to repair equipment yourself. Ensure equipment that is out of service cannot be used.
Do not allow children to use or be around equipment without adult supervision.
If folding the equipment for storage be sure it is kept in a safe place, on level ground and away from children or activities that could knock it over. If in doubt, secure the equipment in an appropriate manner.
Do not exceed the maximum user weight for the equipment.
The F3 can be moved around either open or folded by a single person with relative ease, as the lifting weight is similar to lifting a heavy suitcase. However, if you have back or any similar issues you should avoid moving or folding the F3 alone.
This free-standing equipment must be placed on a flat, stable and horizontal base.
Maximum user weight: 120kg
Maintain correct biomechanical alignment during every exercise. Incorrect technique places excessive strain on joints and soft tissues.
Warning: Injuries to health can result from incorrect or excessive training.
The owner shall ensure that every user is provided with all warnings and instructions before using the equipment.
Using Your Reformer
Adjustment Devices
Ensure all adjustment devices (Foot Bar locks, Rope Adjusters, Shoulder Rests, Headrest positions, etc.) are fully engaged before use. Warning: If any adjustment device is left projecting, it may interfere with the user’s movement and cause injury.
Setting The Load
Adjust springs only when the machine is at rest.
Use caution when changing spring tension to avoid sudden movement.
Care & Maintenance
The safety level of this equipment can be maintained only if it is regularly examined for damage, wear, and correct function. Pay special attention to:
Ropes and rope connectors
Pulleys
Carriage Wheels & Rails
Frame connection points
Springs & spring hooks
Replace any defective or worn components immediately, or remove the equipment from use until repaired.
Accessories for your F3 Reformer
If you have not already purchased them the following accessories may be of interest to enhance your F3 Reformer: